Introducing: A search & relevancy assessment from engineers, not theorists. Learn more
Jul 12, 2021
Leo Shue Schuster
•
OpenSearch
•
5
min read
This is the second post in our OpenSearch series. In this post, we’ll discuss how to set up an OpenSearch cluster on Bonsai, as well as on your local machine.If you want to skip around to the other posts in this series, they can be found here:
The easiest way to get started with OpenSearch is to set up a cluster on Bonsai.io. OpenSearch is available to direct signups from the dashboard, and to Heroku users via the command line or app.json.
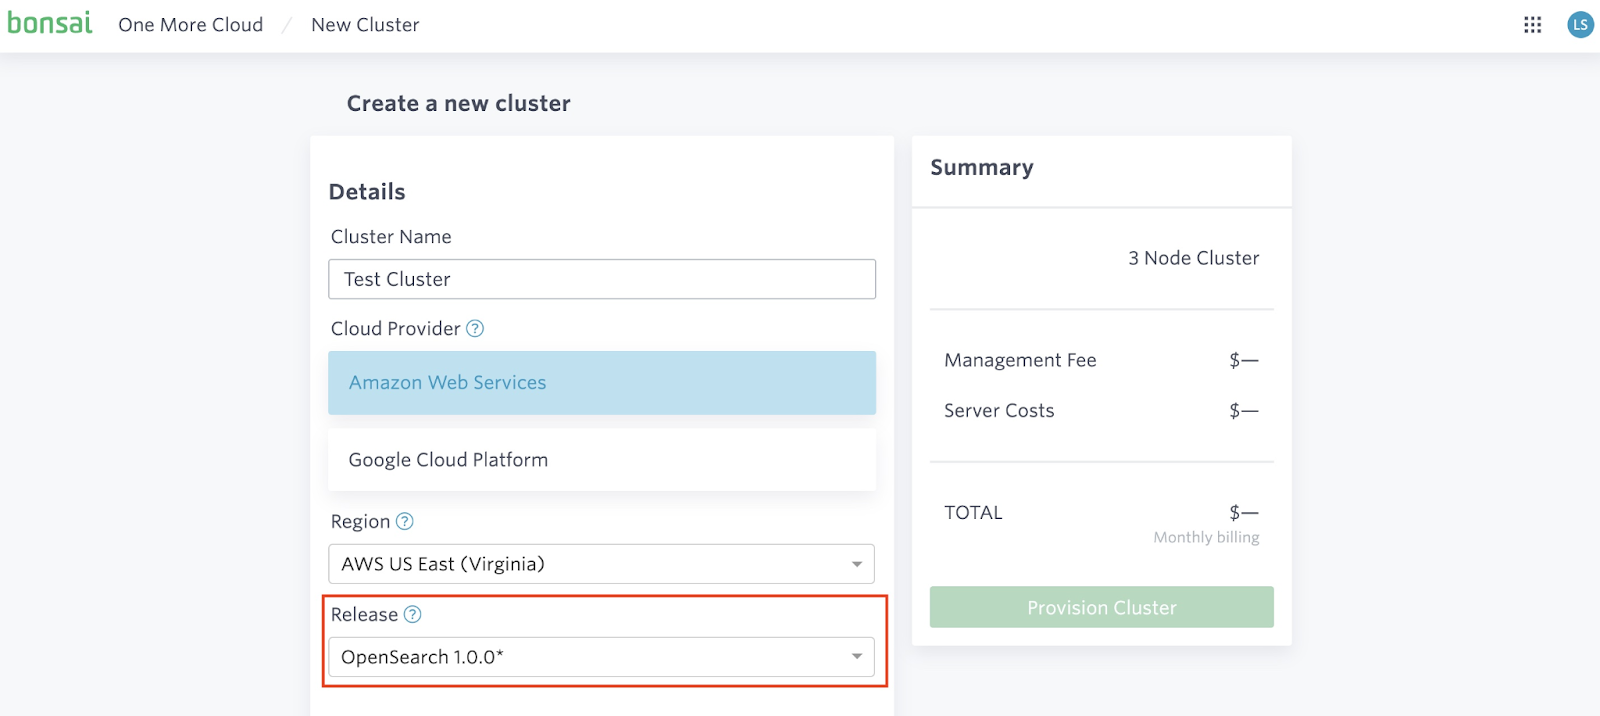
Navigate to the New Cluster form in the Bonsai dashboard. Enter a cluster name, choose a cloud provider and region, and select OpenSearch 1.0.0 under Release like so:
Complete the rest of the form by selecting the support, security & isolation, server type, and plan the cluster should utilize. Once you are ready to create a new cluster, click the green Provision Cluster button.

And that’s it! You’ve just created an OpenSearch cluster on Bonsai. Wasn’t that easy?


Please note that Bonsai clusters take a few minutes to fully provision, and single tenant clusters on average take about 10 minutes to provision.
Adding Bonsai to a Heroku application defaults to creating an Elasticsearch cluster. However, Heroku users can spin up an OpenSearch cluster by using the command line or app.json.To spin up an OpenSearch cluster using the Heroku toolbelt, simply pass in the --engine parameter like so:
<pre><code>heroku addons:create bonsai:sandbox-6 --engine=opensearch</code></pre>
Heroku users can also specify the engine in their app.json where the Bonsai addon is listed:
<pre><code>{ "addons": [ "bonsai", { "plan": "sandbox-6", "options": { "engine": "opensearch" } } ] }</code></pre>
Adding this to the app.json manifest will ensure that things like PR apps and the like that need a search engine will automatically be created with OpenSearch when using Bonsai.
To interact with your cluster, click on the cluster name of the newly created cluster from your account’s cluster listing:

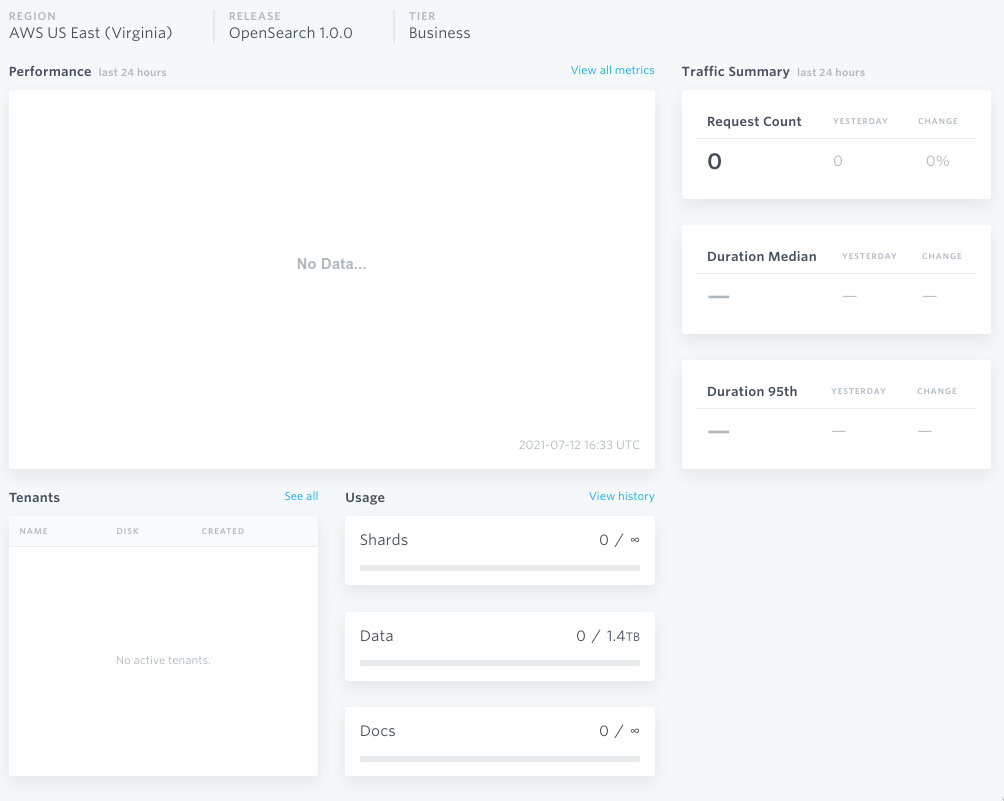
This will take you to that cluster’s dashboard:
You can navigate to the Console to run commands from your browser to your OpenSearch cluster:

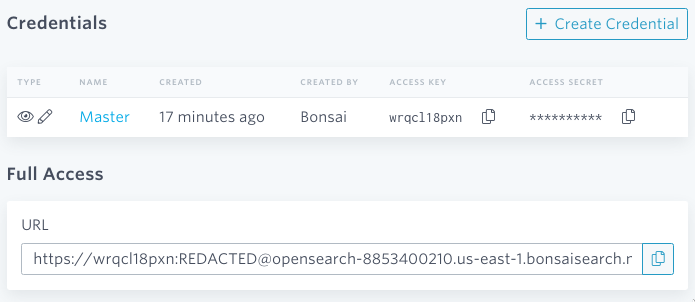
You can also use your Credentials to issue queries from your terminal or application:

Congratulations! You have successfully spun up an OpenSearch cluster! Feel free to experiment with it, and read through the official documentation to learn more about what it can do.
If you don’t want to run OpenSearch on Bonsai, or want more control / debug information about what it’s doing, you can also spin up a cluster locally.Navigate to the official OpenSearch Downloads to get your hands on the latest version. Click on Download OpenSearch to download a tarball. Expand the tarball, move its content to your desired directory, and enter the directory.From within the directory, confirm that your local machine is running at least JDK 14 to build (check with command javac --version). Set your JAVA_HOME environment variable to the path of the JDK like the following example: JAVA_HOME=/usr/lib/jvm/jdk-14. You can run OpenSearch with Java 11 and above.The tarball comes with security plugins to set up SSL and certificates. These are great guidelines to follow, but it can also add some additional complexity. There may be issues with connecting to your local cluster via browser and some versions of curl.If you don’t have a need for SSL, you can remove it. Unload the security plugin with: bin/opensearch-plugin remove opensearch-security. Then open config/opensearch.yml with your favorite editor and comment out any related lines that start with “plugins.x” like so:

You can now start OpenSearch by running bin/opensearch. This will launch a local OpenSearch server. Once the server has loaded, you can check the status of OpenSearch with curl localhost:9200 in another terminal session or a browser. This should return something like:
<pre><code>{ "name": "mycluster.localdomain", "cluster_name": "opensearch", "cluster_uuid": "H5OMi6uNTsK7H2m2b78xIQ", "version": { "distribution": "opensearch", "number": "1.0.0", "build_type": "tar", "build_hash": "26d579287f50bb33e17c8fe1f05ea208d5c64d1f", "build_date": "2021-05-28T18:18:49.848386Z", "build_snapshot": false, "lucene_version": "8.8.2", "minimum_wire_compatibility_version": "6.8.0", "minimum_index_compatibility_version": "6.0.0-beta1" } }</code></pre>
That’s it! You’ve got an OpenSearch cluster running locally on your machine. From here, you can interact and experiment with your cluster. Please refer to the official documentation to learn more about what it can do.
Now that you have OpenSearch running, we hope you and the rest of the community are excited about contributing new features to this open source project. Let us know if you come across any features you’d like to see in Bonsai.If you’re switching from Elasticsearch to OpenSearch, please check out the next post in our series: “How to migrate from an Elasticsearch cluster to OpenSearch”.If you have any questions about setting up OpenSearch on Bonsai, please feel free to reach out at support@bonsai.io or share your thoughts on Twitter: @bonsaisearch.

Schedule a free consultation to see how we can create a customized plan to meet your search needs.
